Google Analytics 4 offers a robust, event-based approach to tracking website activity.
However, the deprecation of Universal Analytics has forced many marketers to relearn their favorite analytics platform, using a dramatically different interface and walking through a new setup process.
Event and conversion setup also comes with a higher learning curve.
Thankfully, Google Tag Manager (GTM) can ease the process of setting up GA4 on your site and reduce the dependency on needing to customize code.
In this article, I’ll show you how to deploy the basic GA4 tracking code through GTM, along with how to create custom events for more comprehensive data.
How to set up the main GA4 code
The gtag.js tag is the basic tracking code you need to place on your site. Once you fire this for all pages, you’ll start recording all the default data GA4 tracks for website visitors.
GTM makes setting up this tag as simple as a few clicks and pasting in an account ID.
Note: If you already have a Universal Analytics tag (analytics.js) firing on your site, you can keep it active alongside GA4. However, per Google, Universal Analytics will stop recording data on July 1, 2023 (GA360 properties will record through July 1, 2024). Data will be accessible for at least six months after this point.
Step 1
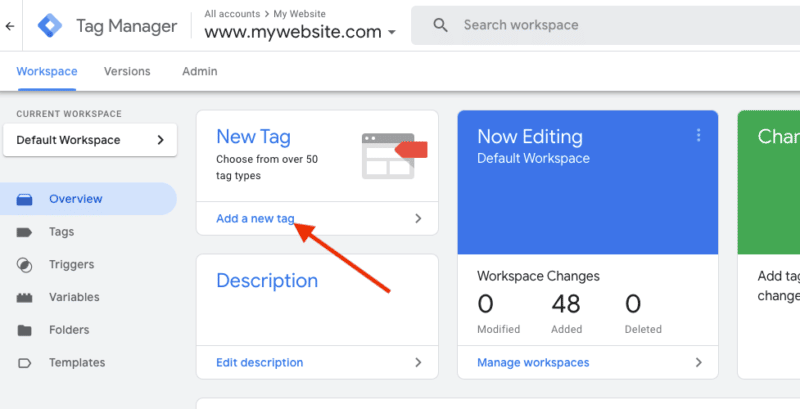
To start setting up your GA4 tag, navigate to your desired account and container within GTM and select “Add a new tag.”

Step 2
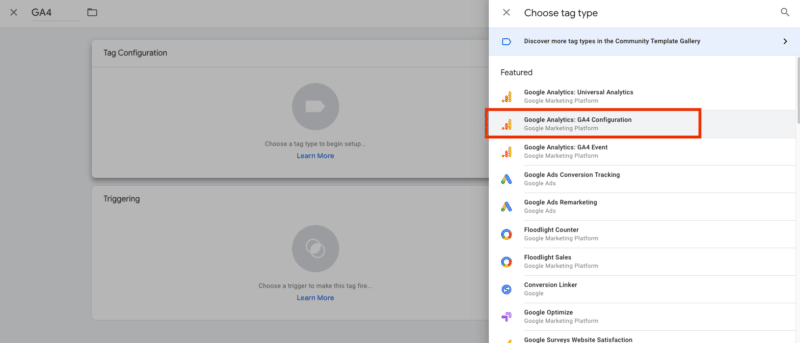
Now, click on “Tag Configuration” to see the options for various types of tags. Select Google Analytics: GA4 Configuration.

Step 3
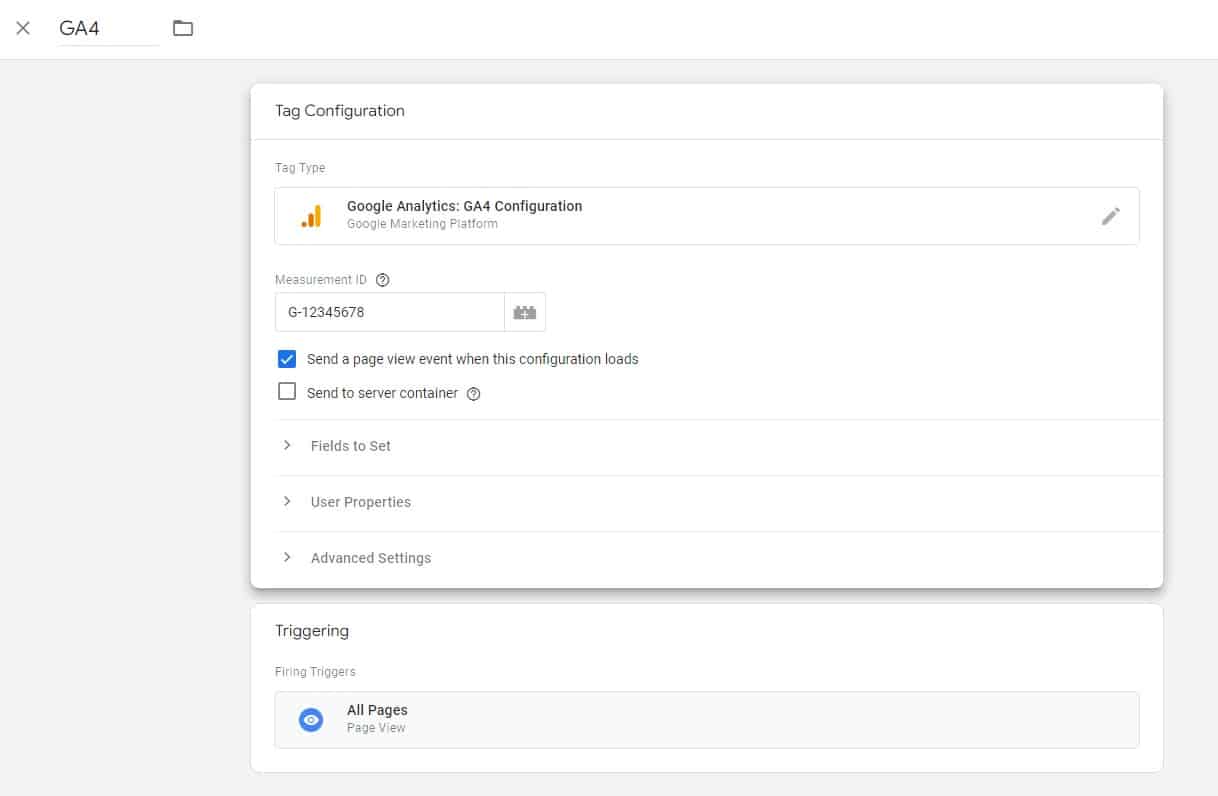
You’ll see a field to enter your Measurement ID. Find your Measurement ID in your account, and paste it here.
Once you’ve saved this tag, you’ll be able to select it from a dropdown in the future when setting up GA4 events instead of having to manually hunt for the ID each time.
For most users, you’ll want to leave the box checked to “Send a page view event when this configuration loads.” This will ensure that each time a user visits a new page, a pageview is tracked on GA4’s end.
There may be some more advanced instances where you don’t want to fire a pageview. (For instance, if you’re using a tag to set properties for a logged-in user or a customer completing a transaction without the page URL changing.)

Step 4
Click within the “Triggering” box to choose where you want the tag to fire on your site. In most cases, you’ll likely want GA4 to fire on all pages.
However, depending on your setup, you may want to exclude certain pages, such as private login sections.
You can create rules based on URL paths, clicks on specific page elements, and more to customize exactly where the tag fires.
Step 5
Save your tag, and publish your GTM container to push it live. You should now see GA4 firing on your site.
To double-check that you’re actually tracking sessions, check the Realtime section of Google Analytics. You should see your own visit reflected here soon after hitting the site.

Now that you have the basic gtag.js tag in place, you can then move to set up some additional customization, such as adding events.
Setting up event tracking for GA4 in Google Tag Manager
Building off of its core focus on event-based measurement, GA4 comes with built-in event tracking for a few site interactions that previously required custom setup in Universal Analytics.
Directly within the GA4 interface, you can enable Enhanced Measurement to fire events for scroll activity, outbound clicks, file downloads, and video views.

However, note that there are still limitations to these events compared to more advanced tracking options you can set up through GTM.
For instance, the scroll tracking option simply triggers a "scroll" event once the user reaches the bottom of the page (measured at the 90% point). By default, you won't be able to track when the user starts to scroll to earlier points of the page.
However, using GTM, you can fire events with specific parameters for different scroll thresholds on the page (such as 25% / 50% / 75% / 100%) for a more comprehensive analysis.
The beauty of GTM lies in the ability to easily fire events for a vast array of actions that users could take on the site.
We'll use scroll tracking as an example event setup here, but note that you can use the GA4 Event tag to create events for any triggers available in GTM.
Step 1
To start, create a new tag with a Tag Type of "Google Analytics: GA4 Event." Choose your GA4 ID under "Configuration Tag."

Step 2
Next, enter the Event Name that you'd like to appear within the Google Analytics interface. In this case, we're using "scroll" to align with the existing "scroll" event that GA4 tracks.
Step 3
Click on the Event Parameters section to expand it. Here, we can add a custom parameter to send further details about the event to Google Analytics.
In this case, we'll send through percentage values for when people scroll to specific points on a page.
Step 4
We'll use "scroll_depth" for the Parameter Name.
Next, the value will be , a variable within GTM that will pull in the scroll percentages as people interact with the page and data is sent back in.
Step 5
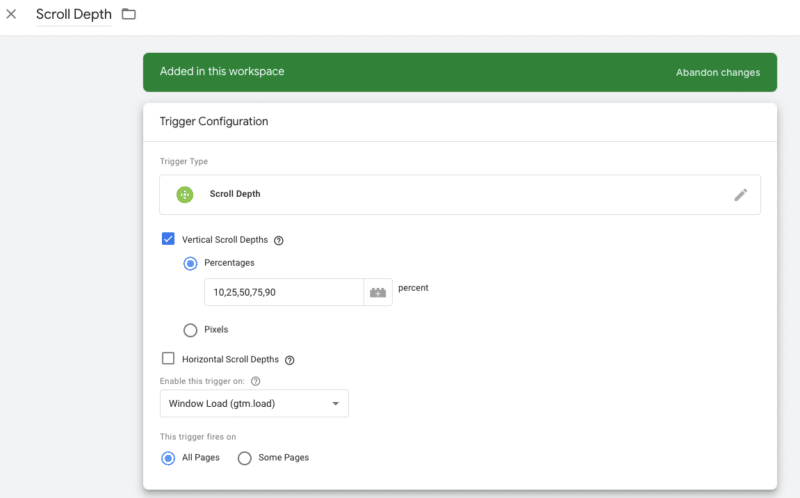
We'll need to create a trigger to determine the values we want to track. Click in the bottom Triggers section to start a new trigger, and select Scroll Depth Trigger.
You can then choose vertical or horizontal scroll depth and select between tracking based on percentages or pixel depth.
With the variety of screen sizes people may be browsing from, the percentage option is likely your best bet here. Add the numbers for the scroll points you want to track, separated by commas.

Step 6
Save the trigger, save your tag, and publish it live.
You should now see more detailed scroll data populate when you look at the Events section in Analytics.
You can use the same basic model presented above to fire additional events into Google Analytics.
Either pull from default GA4 events or create custom event names. Add parameters to include additional details and variable data points.
Setting up GA4 and GTM is easier than you think
Start setting up GA4 with GTM now. As GA4 has entered the mainstream, getting a properly configured property up and running is crucial for any business looking to track performance online.
GTM provides the simplest way to deploy a GA4 setup that's also easily customizable. If you have GA4 active, think through the actions you'd like to track on your site and set up events for those.
The post How to set up Google Analytics 4 using Google Tag Manager appeared first on Search Engine Land.
source https://searchengineland.com/how-to-set-up-google-analytics-4-using-google-tag-manager-374584

0 Comments